
Honest Question: Do you like navigating on paperless ships ?
I am not usually a betting man, but I’d wager that you love sailing on paperless ships. It makes the navigation so much easier.
More than navigation, it makes the tedious process of correction of paper charts less cumbersome.
I am big fan of ECDIS and I believe that our Industry need to expediate in producing more advanced navigation data.
By more advanced data I mean, where all the correction to the ENCs would be possible with just one click. The navigators will then concentrate more on something that they are suppose to do: NAVIGATION.
But while we wait for the advanced data amagement for ECDIS, we must know the present ECDIS procedures.
Right now the process involves more than few clicks,instead it is a process.
I have earlier written about importing ENCs for JRC ECDIS. And I wanted to cover more makes of the ECDIS.
So in this post I will cover the process of ordering ENCs using Chartco and then installing it on Furuno ECDIS.
Let us start !!!
Step 1: Know what ENCs you require for your Voyage
The first step is to shortlist the ENCs that you would require for your next voyage.
Let us assume that right now the ship is at Jubail. The next voyage is to Singapore. And we need to check & order the ENCs for this voyage.
For this open the Chartco, passage manager and click on the Start-Main menu.
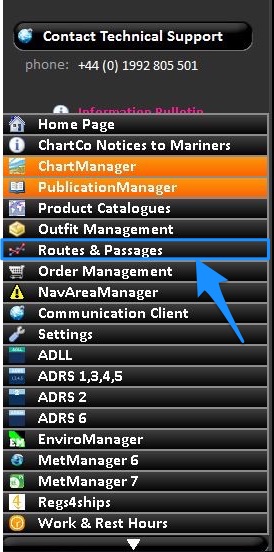
Choose “Routes and Passages” options from the menu items.
Input the “From” and “To” ports and click on “Calculate Route/Distance”.
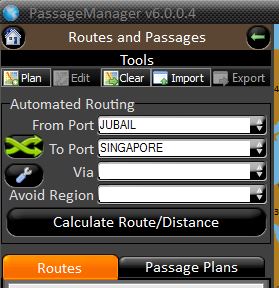
This would give you the route for the voyage (in our example route from Jubail to Singapore).
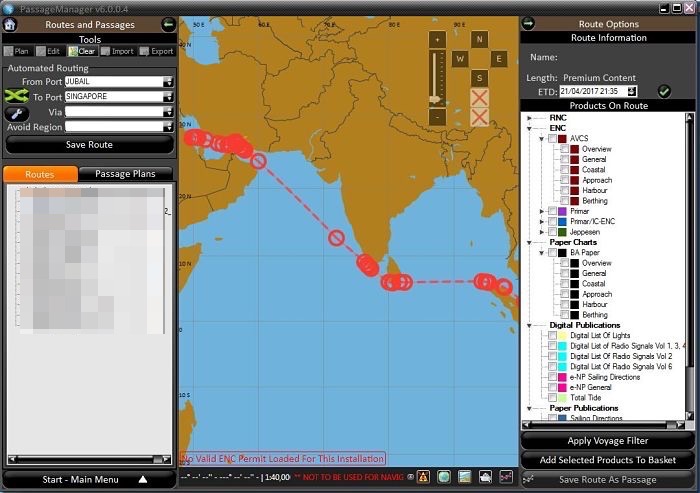
Now from the right panel, tick the ENCs starting with “Berthing”, then “Harbour” and then moving upwards.
If you select all the ENCs together or if you start from “overview” and move downwards, it would be difficult to identify large scale ENCs. In this case there would be chances of missing to order ENCs.
Now say I select “Berthing” and then “Harbour”. Now I can see ENCs which are on my voyage.
The cells (ENCs) which we already have, will be shaded as green. So we do not need to order these ENCs.
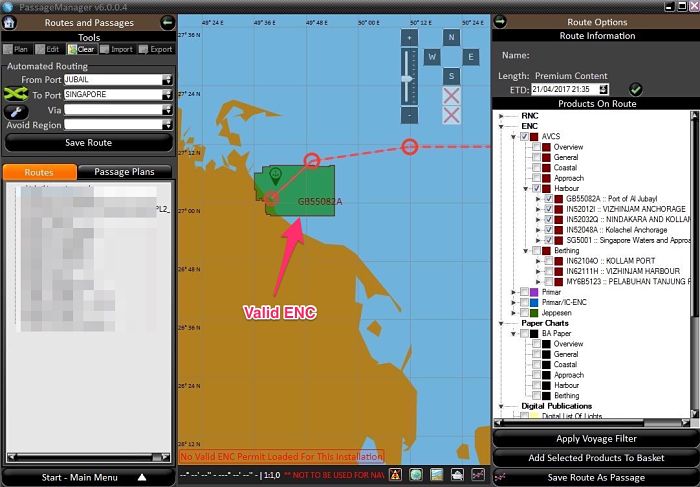
The cells (ENCs) which we do not have will be shaded red and these are the one that we need to order.
Once we have identified the ENCs that are on our voyage and shaded red, select the ENCs by single click on it. The selcted ENC will have the yellow border.
Now we need to add these ENCs to the basket. To do that either
- right click, choose “add to basket” and then “Highlighted products”. Or
- Just click on the “Add selected products to basket”
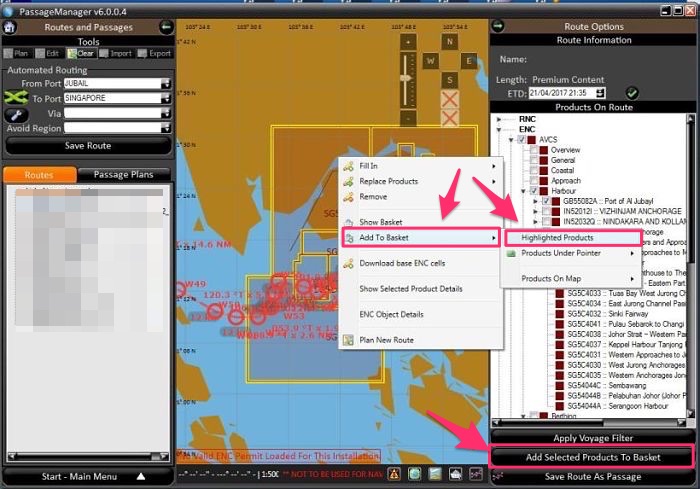
Follow same procedure with all th ENCs you require by clicking on “Approach”, “Coastal”, “General” and “Overview” ENCs.
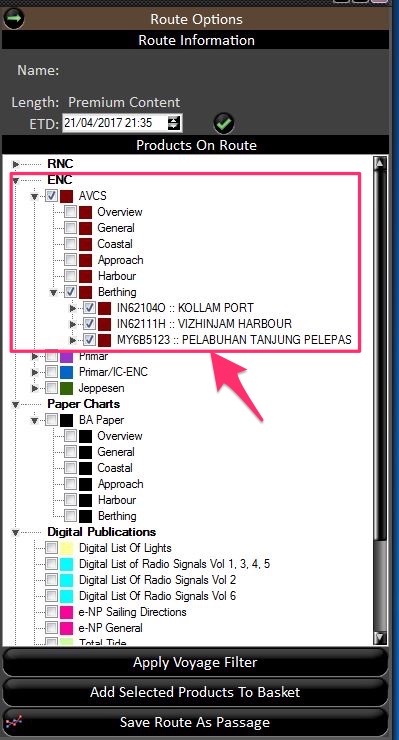
Once you have added all the required ENCs to the basket, the summary of ENCs added to the basket will show at the bottom of the screen.
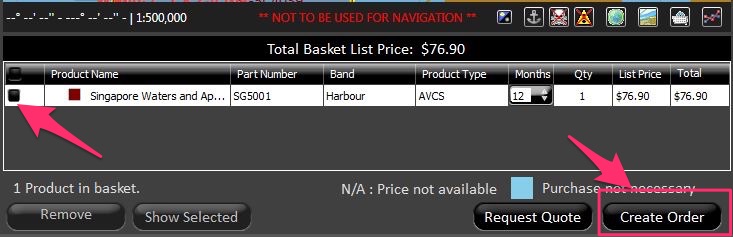
Select all the ENCs in the basket and click on “Create order”.
This will open up a pop up. You can either click on “Export” or just “Ok”. Clicking on export will save the order file at a location choosen by you. Clicking on “Ok” will also save the order in chartco.
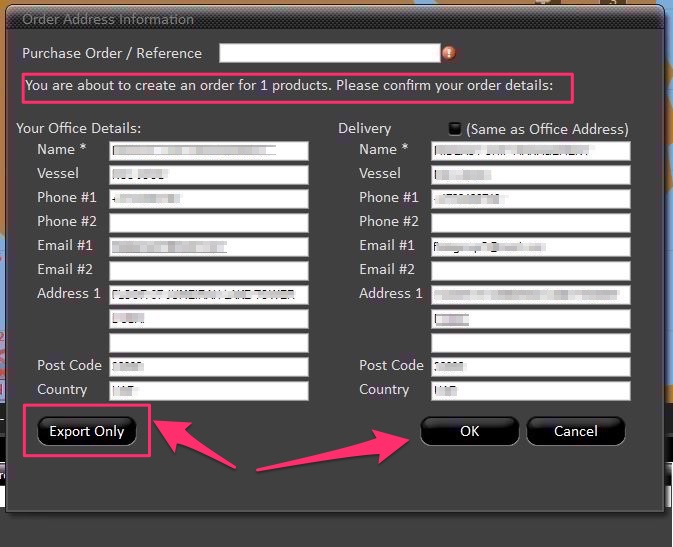
Let us say we click on Export. It will prompt us for a location to save the files. We can save these files in a folder on desktop.
We have now created an order or ENCs from the chartco.
Step 2: Send the ENC request to your ENC provider
Once you have selected the ENCs required for your voyage, you can request those ENCs from your ENC provider.
To do that, just email the order files saved from the Chartco. Follow your company procedures of sending these file. Let us say you can send request the ENCs directly from the supplier.
Then send a request for ENCs to the supplier by email and the request files as attachment.
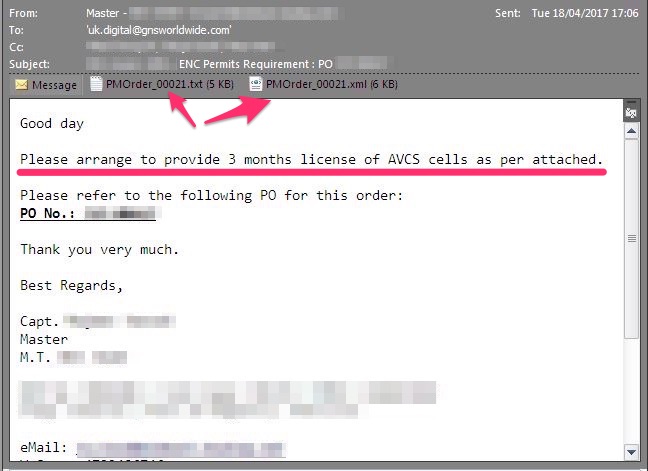
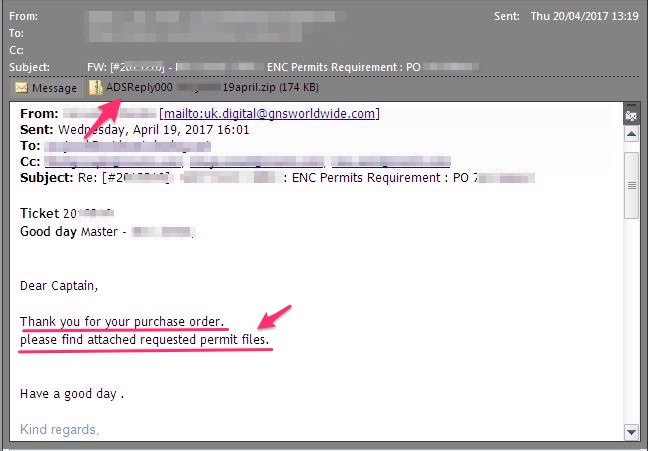
If it is not weekend, you should receive the email containing ENC permit for the requested ENCs.
Step 3: Import the ENCs to the ECDIS
Now you have received what you wanted. The permit file for the required ENCs.
The next step is to import this into your Furuno ecdis. To do that first extract the zip file received from the ENC provider.
Copy the permit folder into a USB flash drive.
Go to ECDIS and insert the USB flash drive in the ECDIS USB slot.
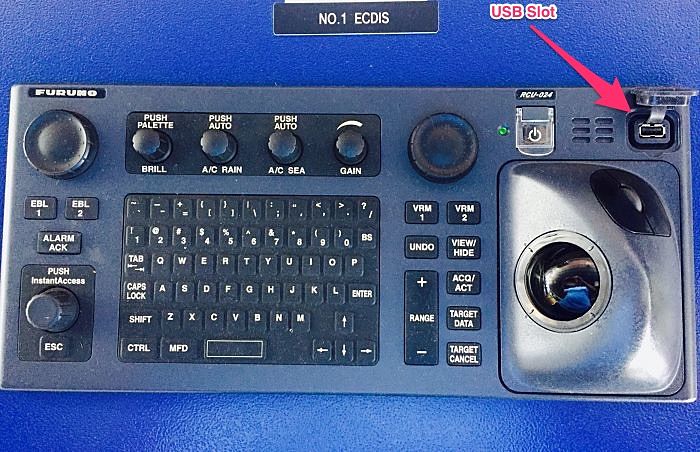
Now on Furuno ECDIS, click the “Chart” tab. Now click on the “Chart” tab. Then go to “Licences” on the left menu bar.
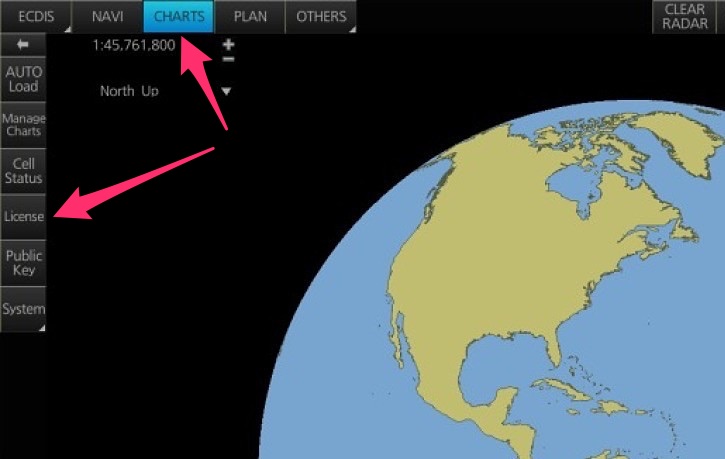
This will open the License status of all the ENCs installed in the ECDIS.
Click on “Install License”
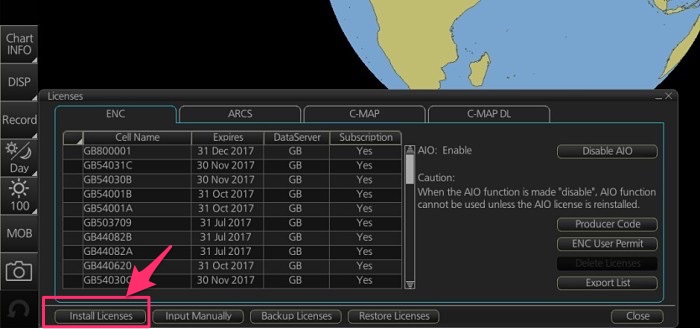
Choose the path to the USB and then to the “permit.txt” file.
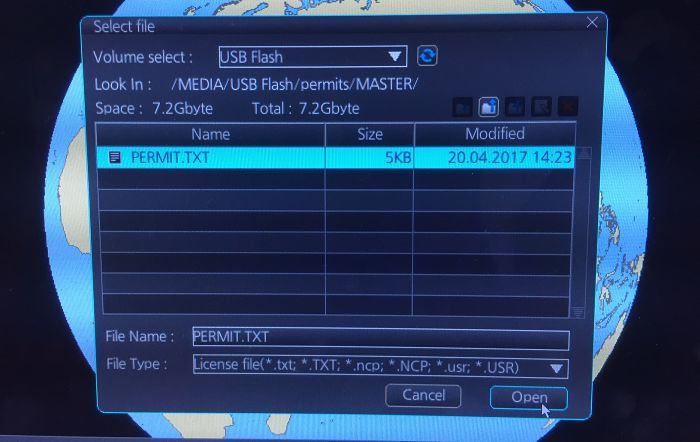
This would install the ENC permit into the ECDIS.
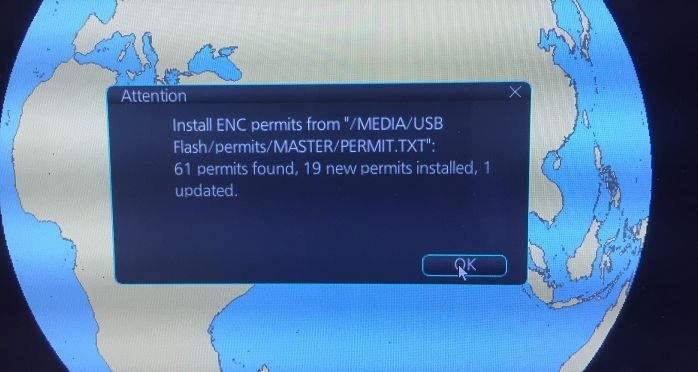
You have now installed the ENCs into your ECDIS successfully. But that alone is not enough. You need to follow the next steps too.
Step 4: Update the permit in Chartco
We have loaded new ENCs in the ECDIS. We need to update the new ENCs in the Chartco inventory. This is important as chartco inventory of ENCs need to match with actual ENCs we have in the ECDIS.
To do that, insert the same USB drive containing permit file in the chartco computer.
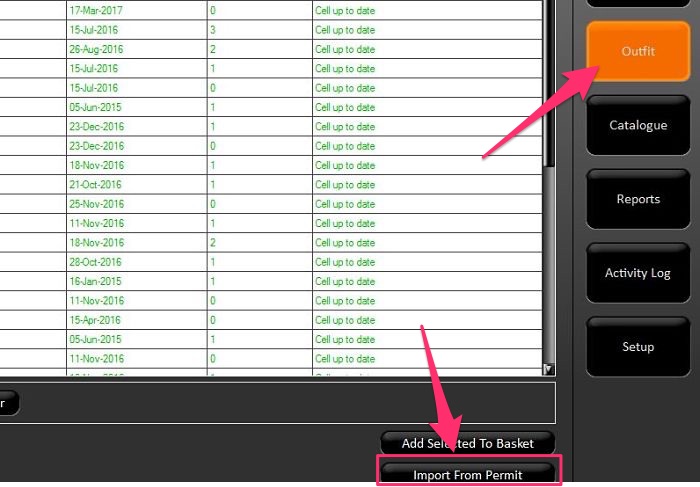
Go to ENC outfit through Home -> ENC -> Outfit.
To update the permits in the chartco, click on the “Import from permit” tab at the bottom right of the screen.
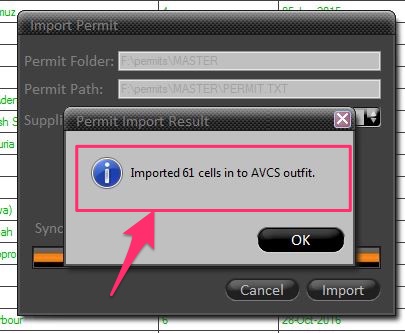
Specify the permit folder (in the USB drive) and import the file into the chartco.

This will import the ENCs into the chartco and the inventory of ENCs is updated in the chartco.
Step 5: Check the status of the Cells
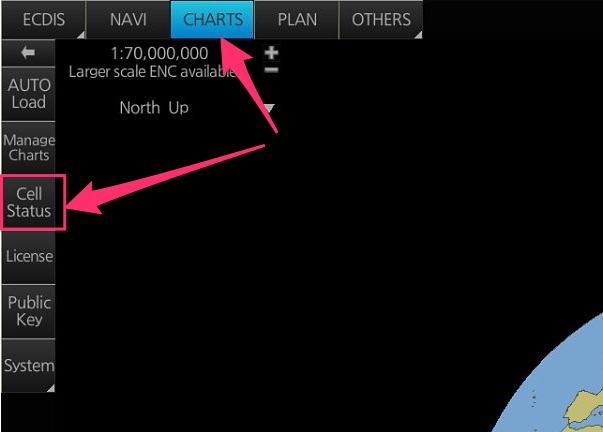
Now that we have installed the new ENCs into your Furuno ECDIS, we need to check the correction status of the cells.
For that while being in the “Chart” mode, click on the “Cell Status” option on left menu bar.
This will show the status of each cells. The status can be viewed as text and also by color coding in the displayed world map.
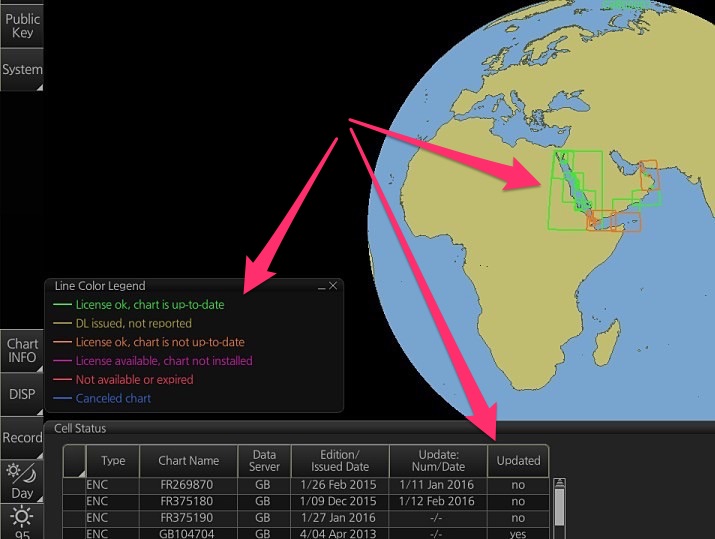
If all the ENCs are up to date and are coloured green, that is good. If not we must follow the next steps to update the ENCs with all the valid corrections.
Even if the ENCs are updated, it is recommended to follow the next steps.
Step 6: Load the latest base cell DVD
Now that ENCs are installed in the ECDIS, we need to apply the latest base cell DVD that ship has.
To do that, insert the DVD into the DVD drive of the ECDIS.
Click Auto-Load and choose the DVD location from DVD drive.
It will update the base cells of the new ENCs to the week of the DVD.
Step 7: Collect the corrections from the Chartco
The base DVD that we applied to the ECDIS also comes with the corrections. But usually the base DVD will not be of the latest week.
For example the base DVD on board could be of week 06/2017 where as the latest week may be 17/2017.
When we applied the base DVD 06/2017 to ECDIS, we have
- Corrected the newly installed ENCs upto week 06/2017, and
- updated the new edition of any base cells of newly installed ENCs
We now have to correct these ENCs to the latest week, 17/2017. And by correcting I mean,
- Weekly corrections upto week 17/2017, and
- Update the base cell of any of these ENCs, which has the new edition issued after week 06/2017
If any of the base cell has a new edition, a message will be displyed after importing permit into the Chartco (As per step 4).
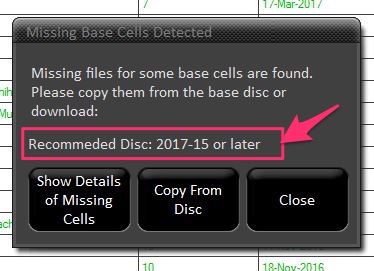
If you do not have the recommended disk, you need to download the base cells. I will come to that in a few minutes.
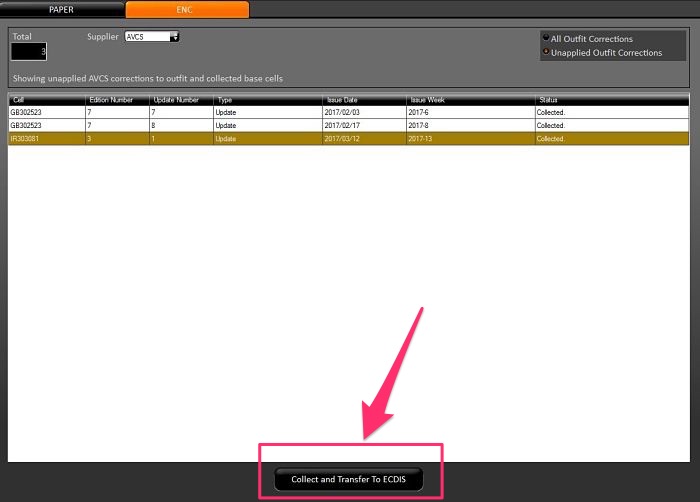
For now, let us collect the corrections from chartco. To do that,
Go to Home -> ENC -> choose “Corrections” option from the right menu bar.
This will show you the pending corrections for the ENCs. From the bottom of the screen, click “Collect and transfer to ECDIS”.
Now if there are any ENCs that has new editions, it will show you a pop up for that.
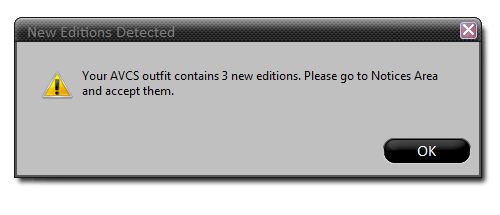
Once you click OK, it will take you to the notice area. This notice area will show you the detail of the ENCs for which new edition (new base cell) is released.
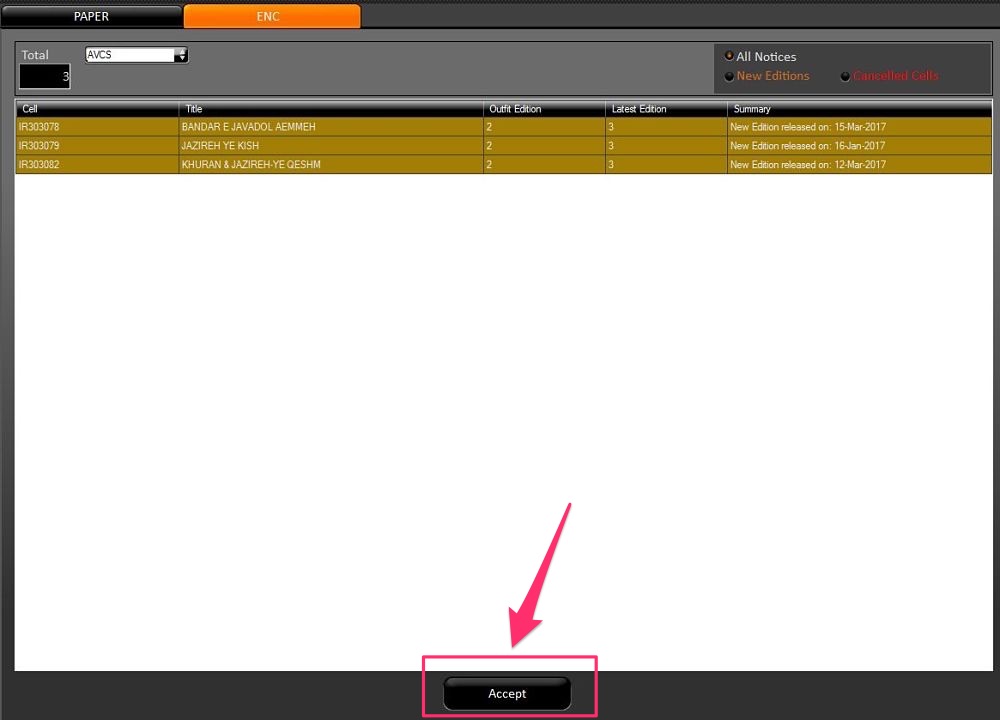
Now you will see “Accept” tab at the bottom of this notice area. Accepting this tab means that
- we are telling chartco that ECDIS is already updated with latest base cells of these ENCs,
- if not, we can choose to accept and then download the base cells for these ENCs
Even when you click on “accept”, it will give you a warning pop up.
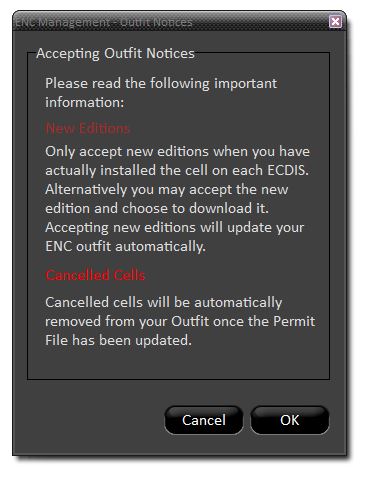
When you click “Ok”, it will give you an option to download the base cells.
If the chartco computer is connected to the internet, it will download the base cells right away.
But if this process is through the email client like “Outlook”, clicking on download will send the request for base cells through email.
For this make sure that before you click on “Download”, the email client (for example outlook) is open on chartco computer.
In this case you need to wait for the email from the chartco server containing the requested base cells.
Once you have received the email, click on the “check for new update” from the home screen of chartco. This will get the chartco to import the base cells from the email.
Now you have the base cells and few corrections that need to be transferred to the ECDIS.
And since now you have downloaded the required ENCs base cells, you can again click on “Collect and transfer to ECDIS” from the corrections tab on chartco.
Choose the location (USB drive) of saving these corrections and then click “Write to Media”.
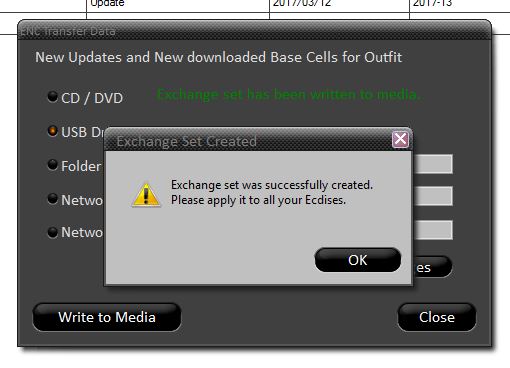
Once you have saved it to the USB drive, the corrections are ready to be applied to the ECDIS.
Step 8: Apply the corrections and base cells to the ECDIS
We are now into the final step. We need to apply the collected base cells and corrections to the ECDIS.
To do that, connect the USB drive to the ECDIS.
Go to Chart -> Auto Load
Point it to the USB drive and then click OK. All the base cells and corrections in the USB will be applied to the ECDIS.
Conclusion
I agree that getting new ENCs into the ECDIS and then correcting these should not be a tedious process. It should just happen in few clicks.
As the technology is reaching on the ship, that would be reality soon. But till then we must know the exact procedure of receiving new ENCs and updating these to latest corrections.
Share this:

About Capt Rajeev Jassal
Capt. Rajeev Jassal has sailed for over 28 years mainly on crude oil, product and chemical tankers. He holds MBA in shipping & Logistics degree from London. He has done extensive research on quantitatively measuring Safety culture onboard and safety climate ashore which he believes is the most important element for safer shipping.
Search Blog
16 Comments

Dear sir could you explain the same procedure for MARIS ecdis with MBA (master bridge assistant ) software since iam a new officer

I will try to get my hands on MARIS ECDIS with MBA software..
Thank you Captain for your hard work and good explanations. Hope to see more. This is what seamen need, cooperation and learning easy to understand. Best wishes!
Sir your blog is so informative that learned so much. In my case we have a Maris Ecdis installed onboard and Cmap provider, I appreciate very much if you can also discuss or send me an email regarding the step by step to ordering and correcting charts on Maris ECDIS.
Dear sir, thank you for your good explanation. Can you provide us with some instructions regarding navigational planning steps on FURUNO ECDIS. Kind regards
Sir, your article is marvelous. In the era where each equipment on bridge has a strange and hard-to-read manual, I find your guides extremely useful. Making such comprehensive guide must be difficult and time consuming, and so I am truly grateful that you took your time to share your vast knowledge with me and other seafarers. Best Regards.
Dear Captain, this article is good, your explanation is very clear, i like it, so i excited to learn what is modern navigation equipment, i am radio officer before and finished joint on board ship 2001. Best/regards.
Realy it is very useful and I follow this procedure to update furuno ecdis with navtor permit but when I updated i get this message on ecdis ( Install_permits: try again later (must receive sync). What can i do to update this week also i made again sync for navtor and still have the same with ecdis
Dear Capt Rajeev. It is very nice to see you are sharing even the minute information and sharing your good knowledge which I think is extremely beneficial to juniors who are not taught well in institutes and by their superiors on board. You are doing a very good job. Best regards Capt Jitender
Great article sir. Topic: Updating BASE DVD You mentioned Step 1: update permit Step 2 : update Base DVD Step 3 : update to the latest week ( did you mean every weekly correction week 7/17, 8/17, 9/17, 10/17, and so on till week 17/2017 ???? ) I think you can load the latest weekly correction directly after the base DVD of week 6/2017. Please correct me if I am wrong. Thank you sir
I am using navtor service... as per the explain abive procedure i have import the licenses... but sime of my charts still showing permit available chart not installed... i have done auto import... but still same situation... what could be the reasone sir...?
I've been a follower to your page sir and you never fail to amaze me on how you share all these amazing informations that can be easily understood . Thank You sir .
Thank you very much for sharing your knowledges.
Very informative sir!! But how do i know my charts are updated to present week?? As enc status report before and after up date shows up to date. Incase I want to show a psc inspector on the ecdis what week it is updated to. How do i do that??
Leave Comment
More things to do on myseatime

MySeaTime Blogs
Learn the difficult concepts of sailing described in a easy and story-telling way. These detailed and well researched articles provides value reading for all ranks.

Seafarers Question Answers
Ask or answer a question on this forum. Knowledge dies if it remains in our head. Share your knowledge by writing answers to the question

MySeaTime Podcast
This podcast on the maritime matters will provide value to the listeners. Short, crisp and full of value. Stay tuned for this section.
Really excellent sir, I am a cadet . I never see my officer request cell permit for JRC ECDIS but he just insert usb flash to ECDIS then go chart portfolio,click “CHART” then C-MAP Ed. 3 then “UPDATE CHART”,after click “PRESS CREATE CHART UPDATE ORDER TO SEND VIA E-MAIL”and select“Zone 0”to create the file and send it to UPDATES@C-MAP.NO.The procedure looks like totally different with yours. Kindly advise,Sir. Thank you
Jie, this post on Chartco with Furuno ECDIS. Looks like your ship has JRC ECDIS and C-Map for which this post will not be applicable.